
Share this
by Simcona on Jun 19, 2023 1:15:00 PM
Control panel layout design is something of an art form.
The goal is to logically arrange each element in a way that balances performance, safety, and usability. One small change to appease the safety gods can upset wire arrangements or current flow.
To design as efficiently as possible without dangerously cutting corners, follow these layout-specific control panel tips:
9 Control Panel Layout Design Guidelines
Industrial-grade control panels are complex creatures to lay out. Focus on these nine areas of design:
- Schematics
- Grouping components
- Internal space
- External space
- Laying wires
- Grounding wires
- Slack & service loops
- Ferrules
- Pull testing
1. Make Your Schematic Count
You know the control panel manufacturing process should start with an assessment of your specs and requirements, which act like the color palette of a painting. For every step after, your schematic acts as the canvas – the foundation of your success.
Perhaps that makes AutoCad and SolidWorks the paintbrushes?
All panel and PLC (programmable logic controller) cabinet layouts should include both physical layout and schematic drawings. All electrical engineers know they must outline the flow of any current-carrying parts. However, the specific physical configuration of controls, wiring, and circuits is sometimes strangely ignored.

Putting an early emphasis on physical layout minimizes launch delays due to unresolved problems discovered during production or testing.
Your industrial control panel schematic should include:
- Bill of materials
- Functional diagram
- Power distribution
- Input/output diagram
- Enclosure & back panel layout
Use control panel layout design software that helps optimize wiring routes. Efficient wiring is a masterstroke that saves installation time and material cost.
(Related post: How UL 508A Affects Your Control Panel Design)
2. Group Components Wisely
There are three ways you can group the components of a control panel: flow, heat considerations, and function.
AC and DC components, as well as their grounding paths, belong on opposite sides of the panel. By separating these types of current flow, you’ll:
- Minimizes short-circuiting
- Reduces electromagnetic interference
- Makes troubleshooting & maintenance easier
Arrange AC and DC components in distinct sections, physically separated by partitions or barriers. Regulations for minimum clearance vary by geographic region.
Heat buildup affects some components more than others, so prioritize the placement of those at-risk parts first. Arrange components that generate significant heat, such as power supplies and variable frequency drives, in a way that exposes them to enough airflow. Put the risky stuff closest to a heat sink, fan, or other cooling device.
Organizing components by function or size is another fundamental aspect of a high-performing panel.
If you can, put devices of similar sizes in a bay together. Also, by grouping similarly functioning components (i.e. contactors and relays), you can:
3. Internal Space
When weighing the physical implications of your design, space is the place to focus first.
Electrical safety, for both users and the public, is dependent on your panel’s layout. The panel should have enough area for an operator to install and service each component safely.
High-voltage components need enough room to work without creating electrical arcs. Follow the component manufacturer’s instructions for minimum distances between conductors, energized parts, and nearby surfaces (both grounded and non-grounded).
Heat buildup becomes a bigger problem as you reduce your product’s footprint.
If your enclosed control panel will face exposure to high external temperatures, place cooling functionality near the most at-risk components. If your box is heavy on temperature-management features, put exhaust vents and air intakes in easy-to-reach spots. This makes filter replacement smoother.
As always, pay special attention to NEC (National Electrical Code) requirements for clearance around power wiring, in addition to UL spacing mandates for heat-producing devices.

Future modifications might not seem important now, but they’ll be easier if you set aside space today.
Leave enough space around each component for easy access and modification after the initial install. A replacement component might be larger than the now-obsolete one you used before. A new project using the same control might require another set of terminal blocks, forcing you to rearrange the panel.
4. External Space
Panel enclosure design may not be the funnest part of the job, but it’s one of the most important.
The size and orientation of your control cabinet has many of the same impacts as your panel’s internal layout, affecting:
- Safety
- Accuracy of readings
- Heat generation
- Installation & access
- Expansion
(A general rule of thumb: Save 20% of the enclosure’s area as spare space.)
The first step to successfully spec’ing an enclosure size is to consider how it’ll perform on Day 1. Double-check that all components fit without coming into contact and short-circuiting each other.
The next step is to think about device service life and how the panel enclosure’s layout may help or harm that.
Put components that need frequent maintenance or adjustment – like control devices and circuit breakers – in places that operators can easily reach them. Just don’t obstruct something else while doing so.
(Related post: Panel Enclosure Buyer’s Guide)
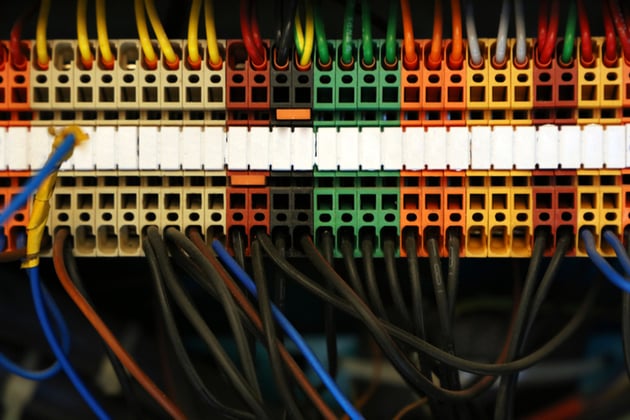
5. Use Wire-Laying Best Practices
Laying wire strategically comes down to physical space and electrical performance.
Fun fact: One of the most common NEC violations in industrial control panel layout design is … insufficient space for wiring.
NFPA 79 exists for this very reason, outlining proper wire size, specs for trays and conduits, and best practices for installation. NFPA 79 is a key standard for PLC panel layout design, as it acknowledges the struggle of cramming so many devices inside an industrial-grade panel.
That struggle is why you should always use proper routing methods like cable trays and conduits (not ties). Don’t skimp on solutions for wire management – in industrial applications, wire tangling and damage are surprisingly quick to happen. Proactive management will also make retrofitting easier, accommodating all the bends and turns you need.
Just like other at-risk parts, sensitive wires should stay away from high-power components. Examples include:
- CAN bus wire
- Profibus wire
- Other data communication & process control wires
Electromagnetic noise can hurt a bus or control cable’s transmission ability.
Sensitive or not, wires should never run diagonally. – Horizontal and vertical runs add useful slack and help keep the panel neat. Don’t run wires in front of devices or the wireway.
To avoid this with ducts, elevate them and run the wires underneath. Bring wire to the front when it’s entering or leaving a duct.
A few other best practices:
- Split & break down power branches inside the panel when possible
- Use stranded wire if you can – it bends more easily and doesn’t create as much heat than solid wire
- For PLCs, place I/O racks in the wiring duct bay, and avoid empty space at the top of the rack
(Related post: UL Wire Specifications & Considerations)

6. Ground Wires Correctly
Poor electrical grounding is one of the top causes of failure in control devices. It’s a human safety risk and produces electrical noise that hampers performance.
Route your grounding wires separately from power lines. This prevents the current from leaking between lines and becoming a shock hazard.
There are other ways your electrical control panel layout design can promote safe, effective grounding:
- Dedicated grounding busbar – Mount this where it’ll be easily accessible for connecting all grounding conductors
- Avoid ground loops – Route grounding conductors in a direct, single-point fashion with only the minimum length needed. This prevents extra looping or connections that cause unwanted noise or voltage differences
Grounding best practices for your project may vary based on your industry standards, electrical codes, or other requirements. Consult these guidelines and your contracted panel engineering company (if you’re outsourcing) to ensure compliance and safety.
7. Service Loops & Slack
Service loops are certainly controversial among electrical engineers.
In many builds, it’s better to have too much than not enough – because not enough could mean rewiring the whole panel later. Service loops at entry and exit points provide several potential benefits:
- Accessibility – less likely to become tangled
- Flexibility – more slack to allow movement
- Maintenance – reduced chance of broken connections or damaged wires
Buyers commonly expect their Industrial assembly to last for decades. In those 20-30 years, components are bound to fail, and the available replacement part might be smaller or come with a shorter wire. If you have to slide a few existing components 2” away from the connection, it’s much trickier when your wire is cut to exact length.
When creating service loops at entry and exit points, leave enough slack to avoid strain on the connection. It’s generally better to “hide” the slack, away from devices. Running wires like the world’s worst track athlete – using the duct’s outside lane, taking corners widely – is a good thing here.
Admittedly, there is such a thing as too much slack. One balanced option is stripping each cable’s jacket 2+ cm from its fitting. This facilitates service looping and saves space.
8. Use Ferrules Wisely
A wire ferrule is a crimped tube that holds together stranded wire extending from stripped insulation.
This small feature can make a big positive impact on your electrical panel’s layout, as it:
- Relieves strain
- Lowers electrical resistance
- Every wire strand can be connected without fear of displacement to the sides
- Reduces strand oxidation due to lack of air space
As with all electrical design, there are right and wrong ways to set up ferrules:
- Size – Make sure they’re properly sized for the application so the connection is strong and they’re easy to insert into terminal blocks.
- Space – Leave space for ferrule termination within the panel. Include proper clearance around terminal blocks and other components, and arrange for easy access for maintenance or modifications.
- Label – Proper wire labeling makes troubleshooting quicker, so clearly ID ferrules with conductor, circuit, and other key info. Consider color-coding ferrules by circuit or function.
9. Pull Test Your Wires
How do you verify connections are laid out in the best way possible? Brute force.
Use a pull test to ensure a connection can withstand force during the control panel’s installation or operation.
To perform a simple pull test, apply gentle pressure on both ends of the wire until you feel resistance. Less resistance equals less chance of the wire separating from the terminal during vibration or movement.
The specifics of your ideal pull testing method may vary by wire type and application. Destructive methods tend to give more useful data.
If you find wires disconnecting too easily, adjust your layout accordingly. You may need to add slack or a service loop, or perhaps there’s a way to arrange your components more efficiently.
From Control Panel Layout to Manufacturing
If you walk away with nothing else away from today, take these reminders:
- Keep sensitive parts away from the bad guys (i.e. power devices), and closer to the good guys (i.e. fans)
- Use clean and professional routing methods
- Verify there’s no room for shorts or bad connections
- Verify there is room for optimal performance – today and in 5 years
Just like how AI apps still can’t fully replicate art skills (see: nine-fingered hands), control panel manufacturing remains a highly manual process. Whether you’re attempting to build control panels in-house or outsource to a contractor, it helps to have a friend. Check out our educational resources here:

No Comments Yet
Let us know what you think